Create a Java Client App in Eclipse
Welcome to Verizon M2M client application development!
This tutorial teaches you how to build your first M2M client application using Java in the Eclipse IDE. The application will log in to create an API session, use the session token to activate a device and retrieve information about the device, and then log out to terminate the session. You’ll learn some fundamentals of working with SOAP in Java, and how to send requests to our web services and receive synchronous responses. (Some M2M API methods also send asynchronous responses, and there is a separate tutorial covering how to receive those responses.)
Put some SOAP in your Java
The Verizon Wireless Network Service API uses SOAP messages in XML format to communicate with your client application. SOAP is a communication protocol that is based on XML, so it can be used on any platform and with any programming language, including Java.
Learn about SOAP and web services:
If this is your first time working with SOAP or XML, don't worry -- you'll only be working with local Java classes and objects. There are standard Java tools and libraries that convert XML messages to Java objects and vice-versa, and you'll create Java classes and methods that communicate with the M2M web services. You don't need to know how to read XML, and you certainly don't need to be a SOAP expert.
This tutorial will walk you through the steps required to configure Eclipse with those SOAP tools, load the M2M web service descriptions into your project, and use the M2M classes and methods to accomplish some common tasks, including:
- Authenticating - Log in with a username and password and obtain a session token.
- Activating a device - Initiate service for a device so that it can send data on the Verizon network.
- Retrieving device information - Find the phone number assigned to the device during activation.
- Logging off - Invalidate a session token so that it can no longer be used.
There is a separate tutorial that covers creating a listening service for asynchronous callback messages from the ThingSpace Platform, and registering to receive those messages.
Before You Start This Tutorial
You're probably ready to jump right in and get started, but there are some preparatory steps that you have to take before you can write an application to communicate with the ThingSpace Platform web services.
- Know account name and API login credentials for your test or production account.
- This is a special username and password that can only be used to authenticate for API sessions. For production accounts, contact your Verizon Wireless business sales representative to obtain these credentials.
- Get your outgoing IP address on our white list.
- As part of our security strategy, the ThingSpace Platform only responds to requests from IP addresses that are on the Verizon M2M Data Center white list. The computer that you use for this tutorial must be configured to send requests from that IP address. Contact your Verizon Wireless business sales representative for more information.
- Have an M2M device available that you can add to your company's account and activate. (For test accounts, the devices are added for you.)
- You will need to know the identifiers for the device and a service plan that it is compatible with. For 3G devices, you can use the ESN or MEID as device identifiers. For 4G devices, you must provide both the IMEI and ICCID identifiers.
You will not be able to create a functional M2M API client until you can check off all of these items.
Install the Software
Before you start this tutorial, you should have downloaded and installed:
During this tutorial, you will download and install:
- Apache Axis2 Web Services engine
- Apache Axis2 plugin for Eclipse
Configure Java to Work with SOAP Web Services
Your client application will interact with web services on the ThingSpace Platform. Your application needs to know what those services are, where to connect with them, and what data can be sent and received.
The ThingSpace Platform web services are described in WSDL files, which are XML documents that conform to the Web Service Description Language. Each web service has its own WSDL file that specifies the location of the service and the operations (methods) that are available in the service. There are also some XSD schema documents that define the details of interacting with the service.The WSDL and schema files for all Verizon Wireless Network Services are included in the Verizon Wireless Network Services SDK.
To work with SOAP web services in Java, you need to convert the WSDLs and schema documents to Java classes and methods, and you need a way to send and receive XML messages. The Apache Axis2 Web Services engine is designed to do exactly that. You'll use the Axis2 plugin to convert the WSDL files to Java classes, and then include some Axis2 libraries in your project that will process XML and handle sending and receiving messages.
Download and Install Apache Axis2
- Download Axis2 (binary distribution) from http://axis.apache.org/axis2/java/core/download.cgi and unzip it into a directory. For this example, we’re unzipping it into C:\Axis2.
- Once you have installed the Apache Axis2 runtime, you need to associate it with the Eclipse workbench. In the workbench, open Window > Preferences > Web services > Axis2 Preferences. On the Axis2 Runtime tab, browse to the location where you installed Apache Axis2. A message will display if the runtime is installed successfully.
Download the Axis2 plugins for Eclipse from http://axis.apache.org/axis2/java/core/tools/index.html. Download both the Service Archive Wizard and the Code Generator Wizard:

Install the plugins into Eclipse:
- Exit Eclipse if it is running.
- The zip files include a “plugins” directory, but you only want the JAR files that are in the zipped plugins directory. Copy the org.apache.axis2.eclipse.codegen.plugin_1.6.2.jar file and the org.apache.axis2.eclipse.service.plugin_1.6.2.jar files directly into thedropinsfolder in the directory where you installed Eclipse. Do not create or use a "plugins" folder in the dropins folder or put these files in the plugins directory.
- Restart Eclipse.
Create a Project and Add the Axis2 Libraries
This tutorial uses a new project to keep things clear. You can also do these steps in an existing project.
Create a new Java Project. This example uses a standard project that is configured with JavaSE-1.7, using jre7, but you can also use a dynamic or standard web project if you have installed a web server and connected it to Eclipse.

- Add some of the Axis2 libraries to the build path. Right-click on the name of your project in the Package Explorer in Eclipse and selectBuild Path > Configure Build Path.
Click theLibrariestab and then clickAdd External Jars.Navigate to the Axis2 library folder (in this example it is C:\Axis2\lib). Add the following jar files (either one-by-one or select multiple files):
- axiom-api-1.2.13.jar
- axiom-dom-1.2.13.jar
- axiom-impl-1.2.13.jar
- axis2-adb-1.6.2.jar
- axis2-kernel-1.6.2.jar
- axis2-transport-http-1.6.2.jar
- axis2-transport-local-1.6.2.jar
- commons-codec-1.3.jar
- commons-httpclient-3.1.jar
- commons-io-1.4.jar
- commons-logging-1.1.1.jar
- httpcore-4.0.jar
- mail-1.4.jar
- neethi-3.0.2.jar
- wsdl4j-1.6.2.jar
- XmlSchema-1.4.7.jar
The Libraries tab in the Java Build Path should look something like this:
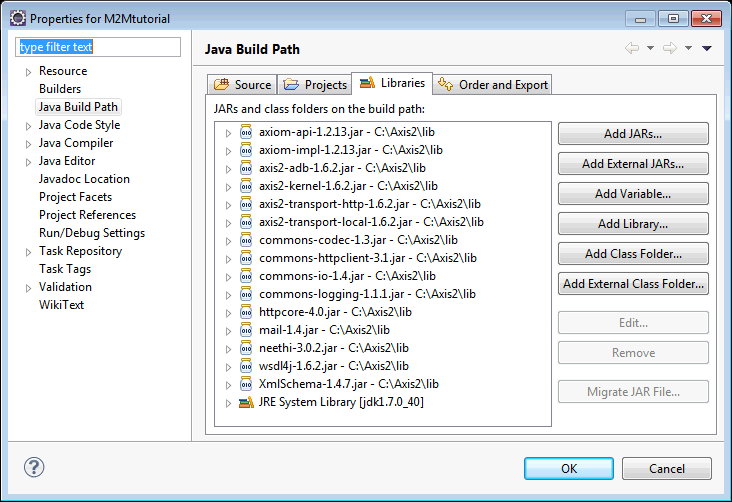
- Click OK to close the Properties window.
Convert the WSDLs to Java Packages
- Move or copy the M2M WSDL and XSD files to a location with no spaces in the path. Eclipse rejects paths that contain spaces. Eclipse only uses the files during the conversion process, so you do not need to import them or keep them with the project. This tutorial shows the files in C:\Temp.
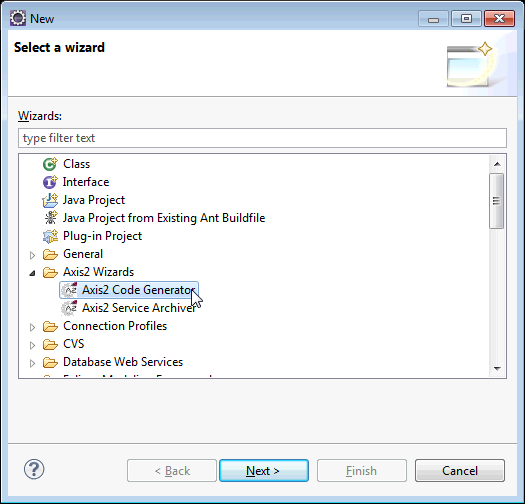
SelectFile > New > Other(or press Ctrl-N) and selectAxis2 Code Generatorfrom the list of wizards and then clickNext.
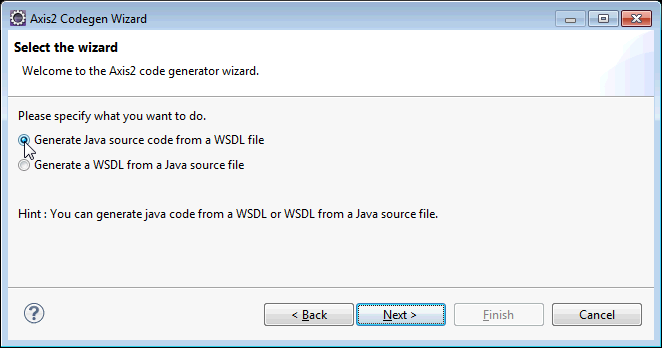
SelectGenerate Java source code from a WSDL fileand clickNext.
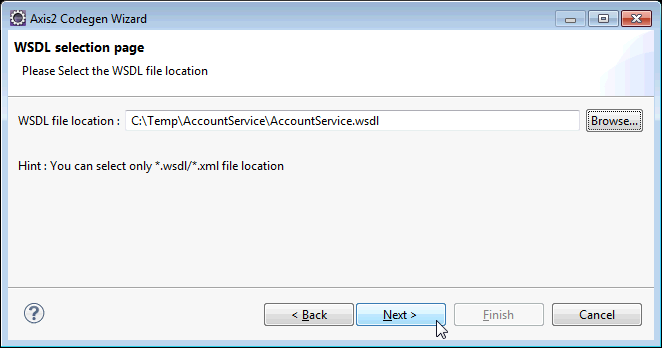
Navigate to the WSDL location and select a WSDL file, then clickNext.
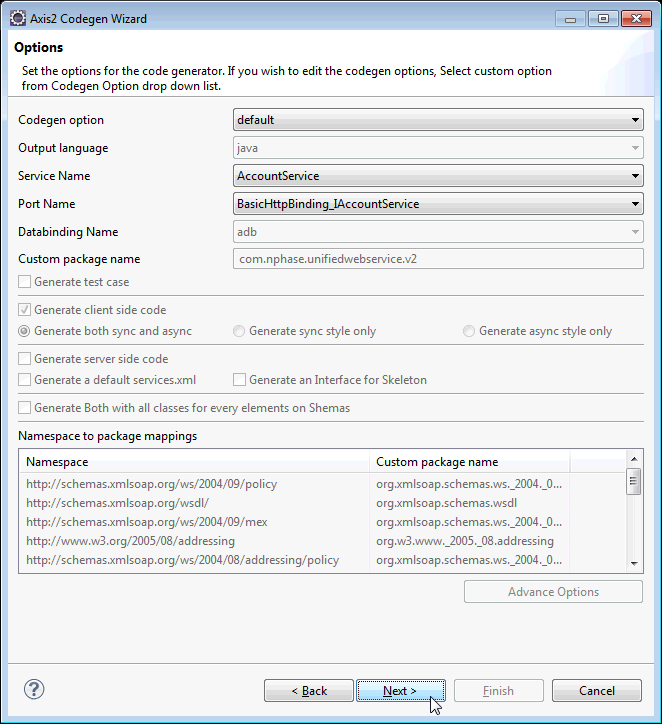
You can review the default settings on the Options page, but you do not need to change anything. ClickNext.
On the Output page, selectBrowse and select a project on current eclipse workspace(not the option selected by default) and then click the Browse button. Select the project that you are using for this tutorial (in this example, it is named M2Mtutorial).
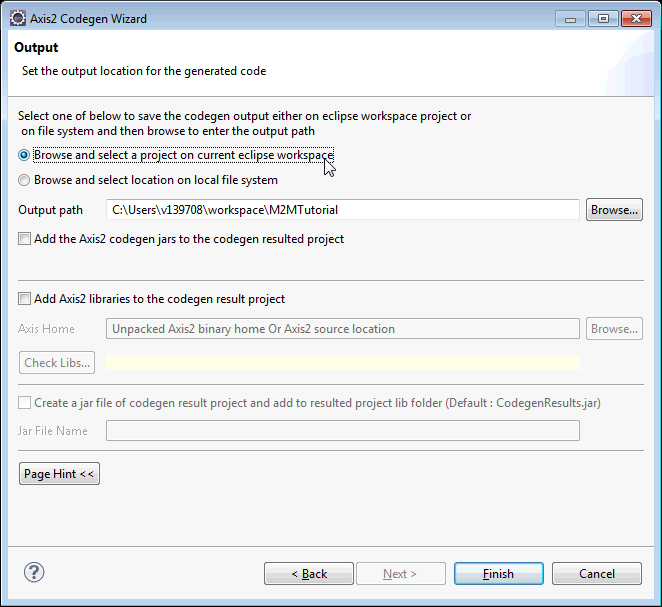
ClickFinishto convert the WSDL.
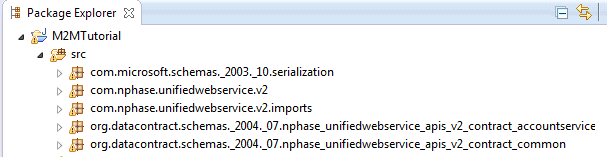
At this point, you might want to see if Eclipse actually generated the packages for the first WSDL file. Click on the Package Explorer, and then press F5 to refresh. You should now see a number of packages in the src directory, like so:
- Repeat the process to use the Axis2 Code Generator wizard to convert every WSDL file in the SDK. You won't use all of them in this tutorial, but you probably will in your real application.
Create Your SOAP Client App
Process Flow
When making calls to Wireless Network Services APIs, your application will follow this flow:
- Log in and receive a session token.
- Make other API calls, putting the session token in the header of each request.
- When all planned requests have been sent, log out when completed, to invalidate the session token.
Some requests take some time to process, such as activating a device or changing a service plan. For those requests, the ThingSpace Platform sends a synchronous response that acknowledges the request and allows your application to continue processing. Later, the platform sends an asynchronous callback message, reporting the results of the request. Working with M2M callback messages is covered in Create a Java Callback Listener in Eclipse.
Log In and Get a Session Token
As part of ThingSpace Platform security, your application must include a valid session token in the header of all requests. To receive one, the application must log in, providing a valid username and password. The SOAP response will include a session token.
NOTE: Your application can use a token as many times as needed, but a session expires after 20 minutes of inactivity. If the ThingSpace Platform returns an error saying that the token is expired, your application will need to log in again to obtain a new token.
To log in to the ThingSpace Platform:
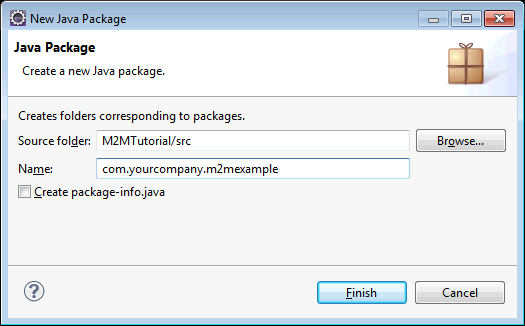
Create a new package for your code. Right-click on the src directory in your project, and then clickNew > Packagefrom the menu. Create a package name to use for this project, and then clickFinish.
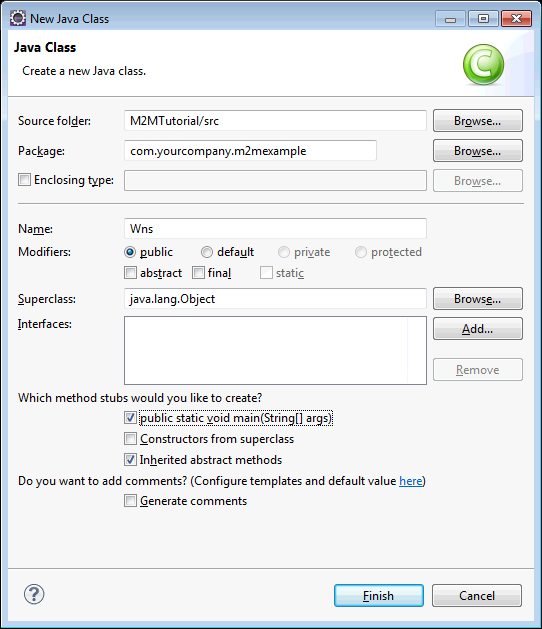
In the Eclipse Package Explorer. right-click on the new package you created and selectNew > Class. Enter a name for the class and clickFinish. In this example, we named the class Wns (for Wireless Network Services). Now you’re ready to code.
Import the Axis libraries for working with SOAP web services
package com.yourcompany.m2mexample;

import org.apache.axis2.AxisFault;
import java.rmi.RemoteException;
import org.apache.axiom.soap.impl.dom.soap11.SOAP11Factory;
import org.apache.axiom.om.OMElement;
Import the jars needed to log in (created from the SessionService WSDL)
import com.nphase.unifiedwebservice.v2.SessionServiceStub;
import com.nphase.unifiedwebservice.v2.LogIn;
import com.nphase.unifiedwebservice.v2.LogInResponse;
import org.datacontract.schemas._2004._07.nphase_unifiedwebservice_apis_v2_contract_sessionservice.LogInRequest;
Create member variables to hold the session token and session service proxy.
public class Wns {

   private static String sessionToken;
   private static SessionServiceStub stub;
Create a login method with the code to log in and store the session token. This tutorial uses System.out.println() so that you can see your code working, but you normally would not need that line.
   private static void Login(String username, String password) {

      // Create a login request object that will make the API call.
      // The LogInRequest class is autogenerated from the WSDL file.
      LogInRequest request = new LogInRequest();

      // Set the username and password for the request
      request.setUsername(username);
      request.setPassword(password);

      //Create a LogIn object to use the LogInRequest
      LogIn loginObj = new LogIn();
      loginObj.setInput(request);

      try {
         stub = new SessionServiceStub();

         // Send the request and get the response
         LogInResponse response = stub.logIn(loginObj);

         // Store the session token from the response
         sessionToken = response.getOutput().getSessionToken();

         // For the tutorial, display a success message
         System.out.println("Log in successful. Session Token is " + sessionToken);

      } catch (AxisFault e1) {
         System.out.println(e1.getReason());
         System.out.println(e1.getFaultCodeElement());
      } catch (RemoteException e) {
         System.out.println(e.getMessage());
      }
   }
Finally, create the main() method to call Login and pass in a username and password.
   public static void main(String[] args) {
      Wns session = new Wns();
      session.Login("username", "password");
   }
}
Log Out
As a security measure, your application should log out of the ThingSpace Platform when finished making requests. Logging out will invalidate the current session token, ensuring that it can't be used for any further requests.
The LogOut request must contain the session token in the header as well as in the body element. The ThingSpace Platform verifies the token, invalidates the session, and then returns the same token in the response.
Add the import statements required to log out
import com.nphase.unifiedwebservice.v2.LogOut;
import com.nphase.unifiedwebservice.v2.LogOutResponse;
import org.datacontract.schemas._2004._07.nphase_unifiedwebservice_apis_v2_contract_sessionservice.LogOutRequest;
Add a logout method.
   private static void Logout() {

      LogOutRequest request = new LogOutRequest();
      request.setSessionToken(sessionToken);

      LogOut logoutObj = new LogOut();
      logoutObj.setInput(request);

      try {
         // Add the session token to the request header of the SessionServiceStub created at login
         // Create an Axis2 soap factory to generate SOAP elements
         SOAP11Factory factory = new SOAP11Factory();
         // Then use the factory to create a "token" element
         OMElement e = factory.createOMElement("token", factory.createOMNamespace("http://nphase.com/unifiedwebservice/v2", "v2"));
         // Set the text of the token element to the current sessionToken
         e.setText(sessionToken);
         // Add the element to the SessionServiceStub object created at log in
         stub._getServiceClient().addHeader(e);

         // Send the request using the SessionServiceStub
         LogOutResponse response = stub.logOut(logoutObj);

         //For the tutorial, display a success message
         System.out.println("Session " + response.getOutput().getSessionToken() + " terminated.");

      } catch (AxisFault e1) {
         // ...
      } catch (RemoteException e) {
         // ...
      }
   }
Call the new method from main().
   public static void main(String[] args) {
      Wns session = new Wns();
      session.Login("username", "password");
      session.Logout();
   }
Activate a Device
Activating service for a device prepares a device for use on the Verizon network, including adding the device to the account (if it’s not added already) and assigning a phone number (MDN/MSISDN). Once activated, a device can send and receive data on the network.
Activating a device is an asynchronous operation that uses CarrierService callbacks to notify you when the activation is complete. Activation usually only takes a few minutes, but can take up to 24 hours to complete. There is a separate tutorial that covers creating a listening service for M2M callback messages and registering to receive those messages.
You must provide a valid service plan code when activating a device. This tutorial includes code for getting a list of service plans in the account, and then uses the code for the first service plan in the activation request. You will probably want something a little more sophisticated in your production application.
Service plans belong to accounts, and device activation is part of the carrier service, so you need to add import statements for the AccountService and CarrierService JARs.
import com.nphase.unifiedwebservice.v2.AccountServiceStub;
import com.nphase.unifiedwebservice.v2.GetServicePlanList;
import com.nphase.unifiedwebservice.v2.GetServicePlanListResponse;
import org.datacontract.schemas._2004._07.nphase_unifiedwebservice_apis_v2_contract_accountservice.GetServicePlanListRequest;
Create a method to get the code for the first service plan in the account.
   private static String GetServicePlanCode(String account) {
      ServicePlan servicePlan = new ServicePlan();

      GetServicePlanListRequest request = new GetServicePlanListRequest();
      request.setAccount(account);

      GetServicePlanList spObj = new GetServicePlanList();
      spObj.setInput(request);

      try {
         AccountServiceStub acctSvcStub = new AccountServiceStub();

         //Add the session token to the request header
         SOAP11Factory f = new SOAP11Factory();
         OMElement e = f.createOMElement("token", f.createOMNamespace("http://nphase.com/unifiedwebservice/v2", "v2"));
         e.setText(sessionToken);
         acctSvcStub._getServiceClient().addHeader(e);

         // Send the request
         GetServicePlanListResponse response = acctSvcStub.getServicePlanList(spObj);

         // Once we have a response, return the first service plan
         servicePlan = response.getOutput().getServicePlans().getServicePlan()[0];

         // For tutorial, display success message
         System.out.println("Using service plan " + servicePlan.getName() + " with code " + servicePlan.getCode());

         return servicePlan.getCode();

      } catch (AxisFault e1) {
         return e1.getMessage();
      } catch (RemoteException e) {
         return e.getMessage();
      }
   }
To activate a device, you have to include identifiers for the device, such as the ICCID (for the SIM card) or the IMEI, ESN, or MEID of the device itself. To activate a 4G device, you must use both the IMEI and the ICCID, in that order. This tutorial uses the two identifiers for a 4G device.
   private static void ActivateDevice(String account, String svcPlanCode) {
      // Create the identifiers for one device, each containing Kind and Identifier fields
      DeviceIdentifier deviceId1 = new DeviceIdentifier();
      DeviceIdentifier deviceId2 = new DeviceIdentifier();
      deviceId1.setKind("IMEI");
      deviceId1.setIdentifier("358676055941442");
      deviceId2.setKind("ICCID");
      deviceId2.setIdentifier("8901260122571639754F");

      // Put the identifiers for a single device into an ArrayOfDeviceIdentifier
      ArrayOfDeviceIdentifier deviceIds = new ArrayOfDeviceIdentifier();
      deviceIds.addDeviceIdentifier(deviceId1);
      deviceIds.addDeviceIdentifier(deviceId2);

      // A DeviceIdentifierCollection holds the arrays of device IDs for all devices in the request
      DeviceIdentifierCollection deviceIdCollection = new DeviceIdentifierCollection();
      deviceIdCollection.setDeviceIdentifiers(deviceIds);

      ArrayOfDeviceIdentifierCollection deviceList = new ArrayOfDeviceIdentifierCollection();
      deviceList.addDeviceIdentifierCollection(deviceIdCollection);
You use the ChangeDeviceStateRequest in the CarrierService to make any device state changes. The request has an ActivateDeviceRequest object as a property. (It also has properties for suspending, deactivating, and restoring devices.) The ActivateDeviceRequest object contains properties for the service plan code and the MDN Zip code, which is the Zip code where you expect the device to be used the most. Add the following code under the code you just added. The Zip code is set to 98115.
      // Create request to change the device state to active
      ActivateDeviceRequest adr = new ActivateDeviceRequest();
      adr.setServicePlan(svcPlanCode);
      adr.setMdnZipCode("98115");

      ChangeDeviceStateRequest cdsRequest = new ChangeDeviceStateRequest();
      cdsRequest.setAccountName(account);
      cdsRequest.setDeviceList(deviceList);
      cdsRequest.setActivate(adr);

      ChangeDeviceState cdsObj = new ChangeDeviceState();
      cdsObj.setInput(cdsRequest);
Send the request, and save the returned Request ID to match up with the callback message.
      try {
         CarrierServiceStub CarrierSvcStub = new CarrierServiceStub();

         //Add the session token to the request header
         SOAP11Factory factory = new SOAP11Factory();
         OMElement e = factory.createOMElement("token", factory.createOMNamespace("http://nphase.com/unifiedwebservice/v2", "v2"));
         e.setText(sessionToken);
         CarrierSvcStub._getServiceClient().addHeader(e);

         // Send the request to activate and capture the response
         ChangeDeviceStateResponse cdsResponse = CarrierSvcStub.changeDeviceState(cdsObj);

         // Store the returned request ID for later use
         String requestId = cdsResponse.getOutput().getRequestId();

         // For tutorial, display request ID
         System.out.println("Activate request acknowledged with request ID " + requestId);

      } catch (AxisFault e1) {
         // ...
      } catch (RemoteException e) {
         // ...
      }
   }
Finally, call the new method from main(). Replace "username," "password," and "account" with your UWS log in credentials and account name. (In a real application, you would probably have the user enter this information in form fields.)
   public static void main(String[] args) {
      Wns session = new Wns();
      session.Login("username", "password");
      session.ActivateDevice("account", Wns.GetServicePlanCode("account"));
      session.Logout();
   }
Check the Status of the Device
After your application has received the callback message indicating that the device activation is complete, you may want to pull all of the information about the device and add it to your local database of devices. For example, your application can parse the returned information to find the phone number that was assigned to the device. The following code requests the information for the previous device and checks the state and MDN/MSISDN value.
NOTE: Because activation can take some time, do not create your application to make an activation request and then immediately check the device information. The device state will not change until after the asynchronous callback has been sent. Best practice is to wait until after receiving the callback before checking the device information.
Add the import statements for the DeviceService.
import com.nphase.unifiedwebservice.v2.DeviceServiceStub;
import com.nphase.unifiedwebservice.v2.GetDeviceInformation;
import com.nphase.unifiedwebservice.v2.GetDeviceInformationResponse;
import org.datacontract.schemas._2004._07.nphase_unifiedwebservice_apis_v2_contract_deviceservice.CarrierInformation;
import org.datacontract.schemas._2004._07.nphase_unifiedwebservice_apis_v2_contract_deviceservice.GetDeviceInformationRequest;
Add a method to request the device information.
   private static void GetDvcInformation() {
      // Create a device information request
      GetDeviceInformationRequest gdiRequest = new GetDeviceInformationRequest();

      // Set the device ID to be the same device as before
      // 4G devices only need 2 identifiers when activating
      DeviceIdentifier deviceId = new DeviceIdentifier();
      deviceId.setKind("IMEI");
      deviceId.setIdentifier("358676055941442");
      gdiRequest.setDevice(deviceId);

      GetDeviceInformation gdiObj = new GetDeviceInformation();
      gdiObj.setInput(gdiRequest);
      GetDeviceInformationResponse gdiResponse = new GetDeviceInformationResponse();

      try {
         DeviceServiceStub dvcSvcStub = new DeviceServiceStub();

         // Add session token to request header
         SOAP11Factory f = new SOAP11Factory();
         OMElement e = f.createOMElement("token", f.createOMNamespace("http://nphase.com/unifiedwebservice/v2", "v2"));
         e.setText(sessionToken);
         dvcSvcStub._getServiceClient().addHeader(e);

         // Make the request
         gdiResponse = dvcSvcStub.getDeviceInformation(gdiObj);

      } catch (AxisFault e1) {
         // ...
      } catch (RemoteException e) {
         // ...
      }
Find the device state and assigned MDN/MSISDN.
      // Find the device state
      CarrierInformation carrierInfo = new CarrierInformation();
      String dvcState;
      carrierInfo = gdiResponse.getOutput().getDevice().getCarrierInformation().getCarrierInformation()[0];
      dvcState = carrierInfo.getState();
      System.out.println("Device state is " + dvcState);

      // If the device is active, get the MDN/MSISDN assigned by the network
      if (dvcState.equals("active")) {
         for (DeviceIdentifier dvcId : gdiResponse.getOutput().getDevice().getDeviceIdentifiers().getDeviceIdentifier() ) {
            if ((dvcId.getKind().equals("mdn")) | (dvcId.getKind().equals("msisdn"))) {
               // You probably want to record the phone number,
               // but here we'll just display it
               System.out.println(dvcId.getKind() + " is " + dvcId.getIdentifier());
            }
         }
      }
   }
Call the new method from main().
   public static void main(String[] args) {
      Wns session = new Wns();
      session.Login("username", "password");
      session.ActivateDevice("account", Wns.GetServicePlanCode("account"));
      //Normally wait for the CarrierService callback before calling GetDeviceInformation
      session.GetDvcInformation();
      session.Logout();
   }